Developer Guide
GULIO (Get Ur Life In Order) is a desktop app that provides a single consolidated and personalised workspace for NUS SoC students to organize their modules. It is optimized for use via a Command Line Interface (CLI) which SoC students will be familiar with typing in, instead of a Graphical User Interface (GUI).
This guide is for developers looking to modify GULIO. For users of GULIO, please refer to the User Guide here.
Table of Contents
- How to Use This Guide
- Setting up GULIO on Your Computer
- Introduction
- Design
- Implementation
- Appendix: Requirements
- Appendix: Instruction for Manual Testing
- Appendix: Command Summary
How to Use This Guide
Icons & labels used in this guide:
💡 - indicates a tip that may be useful to you.
⚠ - indicates a warning that you should take note of.
Italic - Indicates that the content is a component.
Inline code - Indicates that the content is a class, method or input by the user.
Setting up GULIO on Your Computer
- Fork this repo, and clone the fork into your computer.
- Ensure you are using Java 11 or above.
- Import the project in your IDE.
💡 You are highly recommended to use Intellij IDEA.
To set up Intellij:
- Ensure Intellij is configured to use JDK 11.
- Import the project as a Gradle project.
- Verify the setup:
- Run
seedu.duke.Dukeand try a few commands.- Run the tests to ensure they all pass.
Introduction
Background of GULIO
GULIO is a command line application for NUS SoC students to organize their modules. It has a 2-layer system: dashboard layer and module layer. In both layers, the user has access to a different set of commands.
On start up, the user will be on the dashboard layer and has an overview of all their modules. They will have access to module management commands such as adding, deleting or opening a particular module. Opening a module then puts them on the module layer where they can interact with the data within the module.
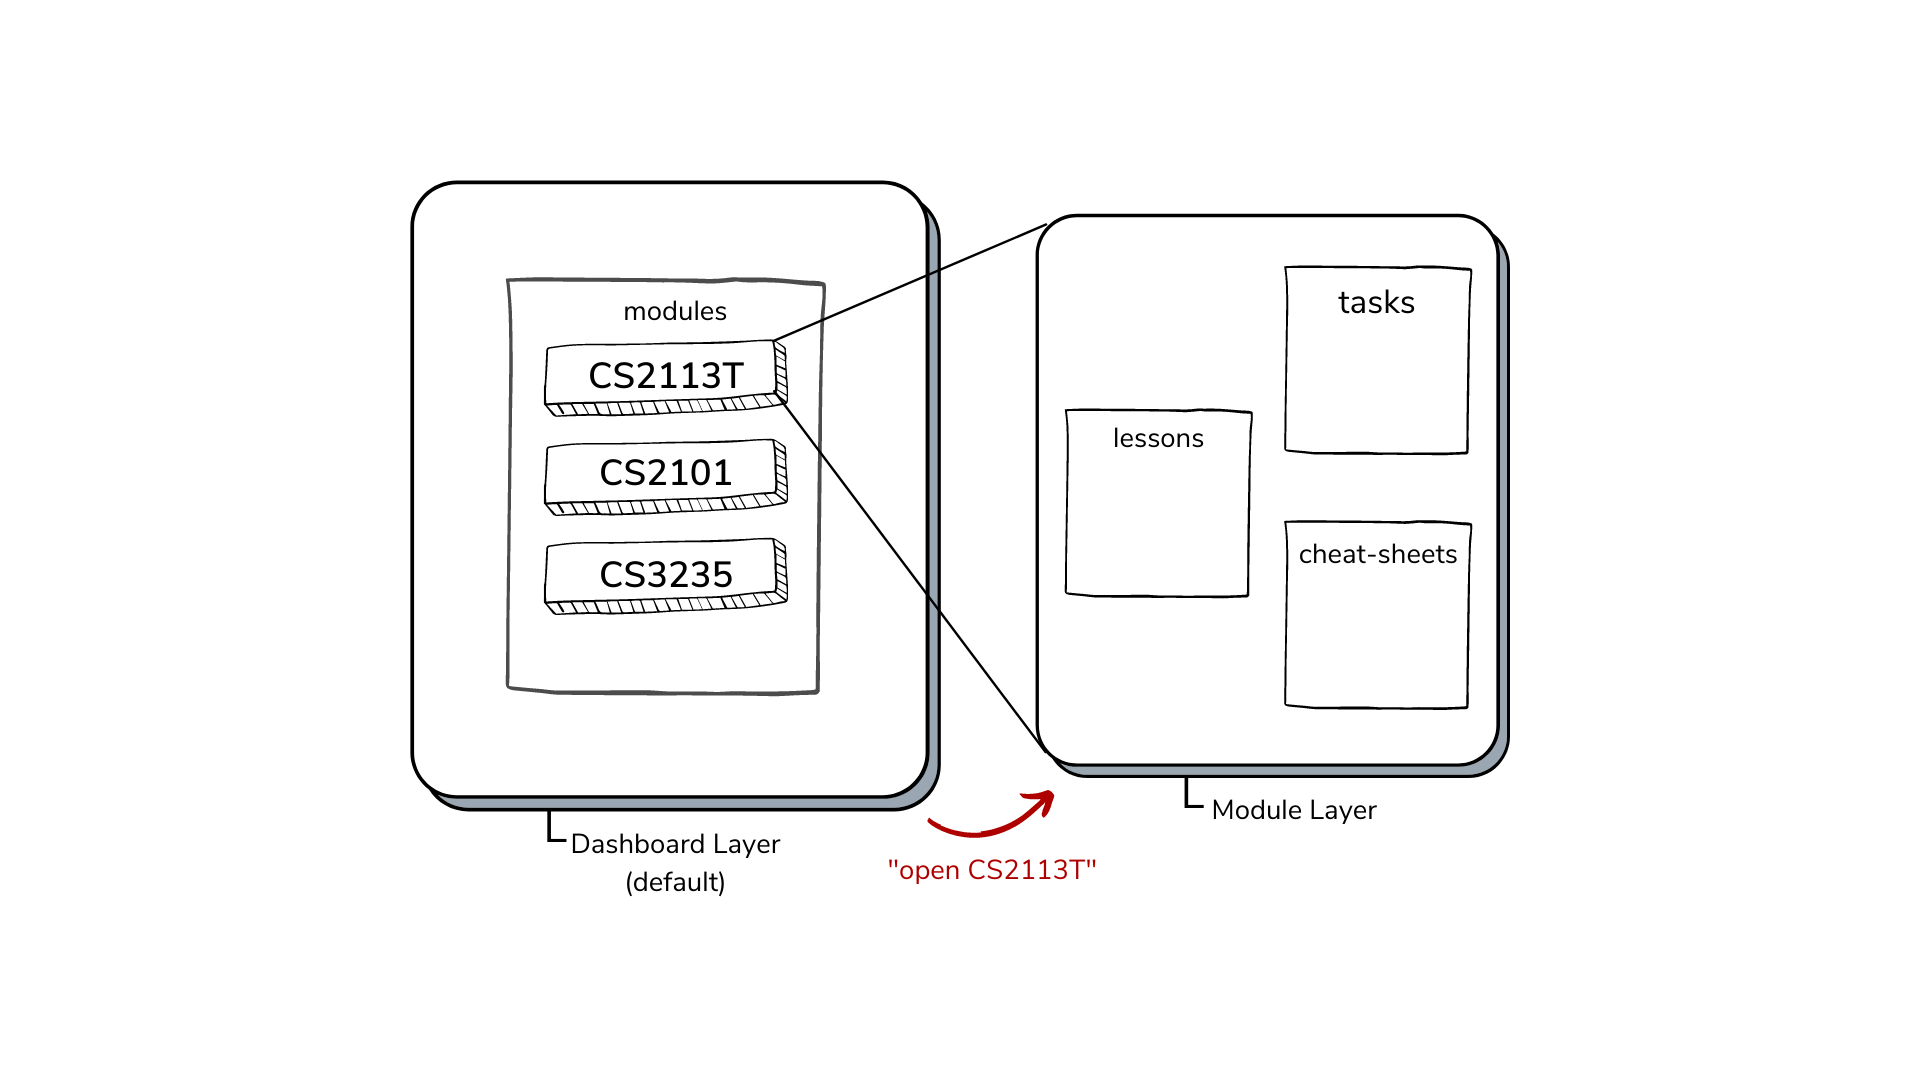
Figure 1 - Visualisation of GULIO’s 2-layer system
Currently, GULIO is a basic university module manager intended to provide students with an overview and consolidated workspace for all of their modules, lessons, tasks and cheat-sheets. Going forward, we feel that GULIO has the potential for many more features to be added, some of which are proposed in the Implementation section.
Scope
This document describes the software architecture and software design decisions for the implementation of GULIO. The intended audience of this document is the developers, designers, and software testers of GULIO.
Design
Architecture
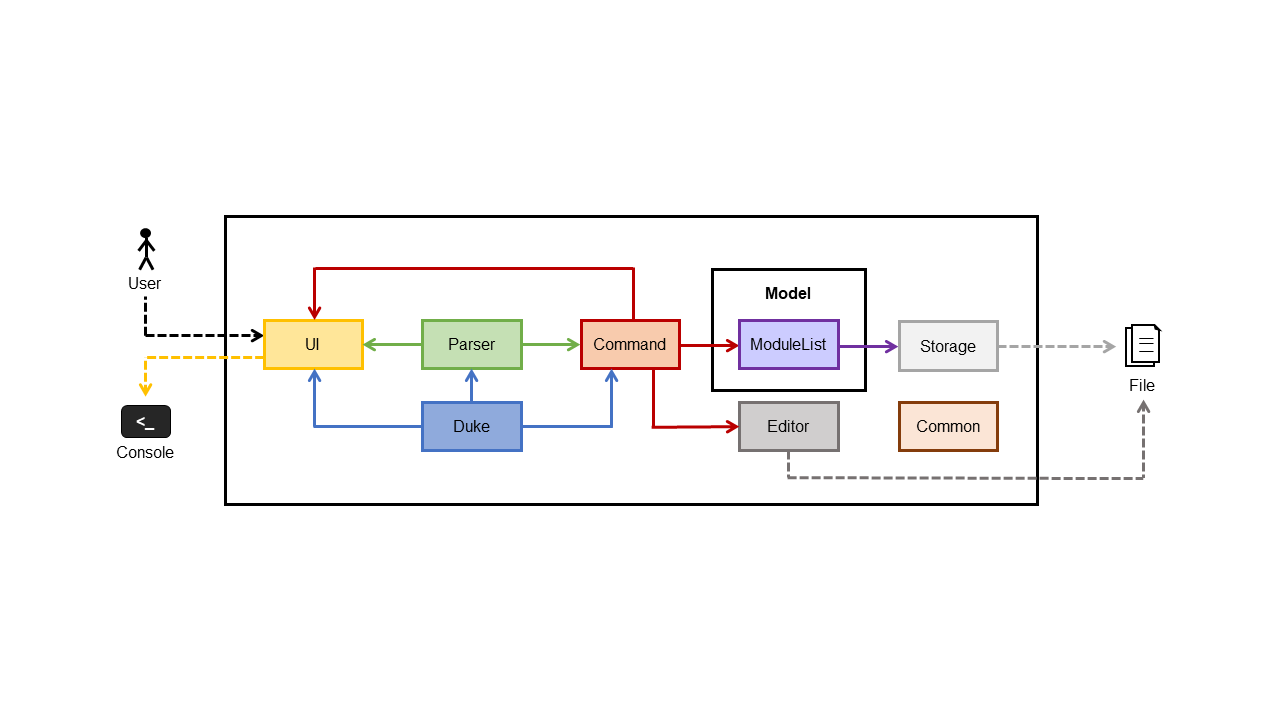
Figure 2 - GULIO Architecture Diagram
Duke contains the main method which is required by Java to run the application. It is responsible for instantiating and calling methods from the UI, Parser and Command components.
Apart from Duke, the application consists of the following components:
- UI : Handles reading and printing
- Parser : Validates and checks user input
- Command : Executes commands
- Model : Consists of data related to the application
- Storage : Handles loading and storing of data into text files
- Editor : Graphical interface for users to type
- Common : collection of classes used by multiple components
GULIO is a local application that stores its application data using readable text files, allowing users the flexibility of viewing and editing data locally.
The way GULIO runs and handles user input can be described as follows:
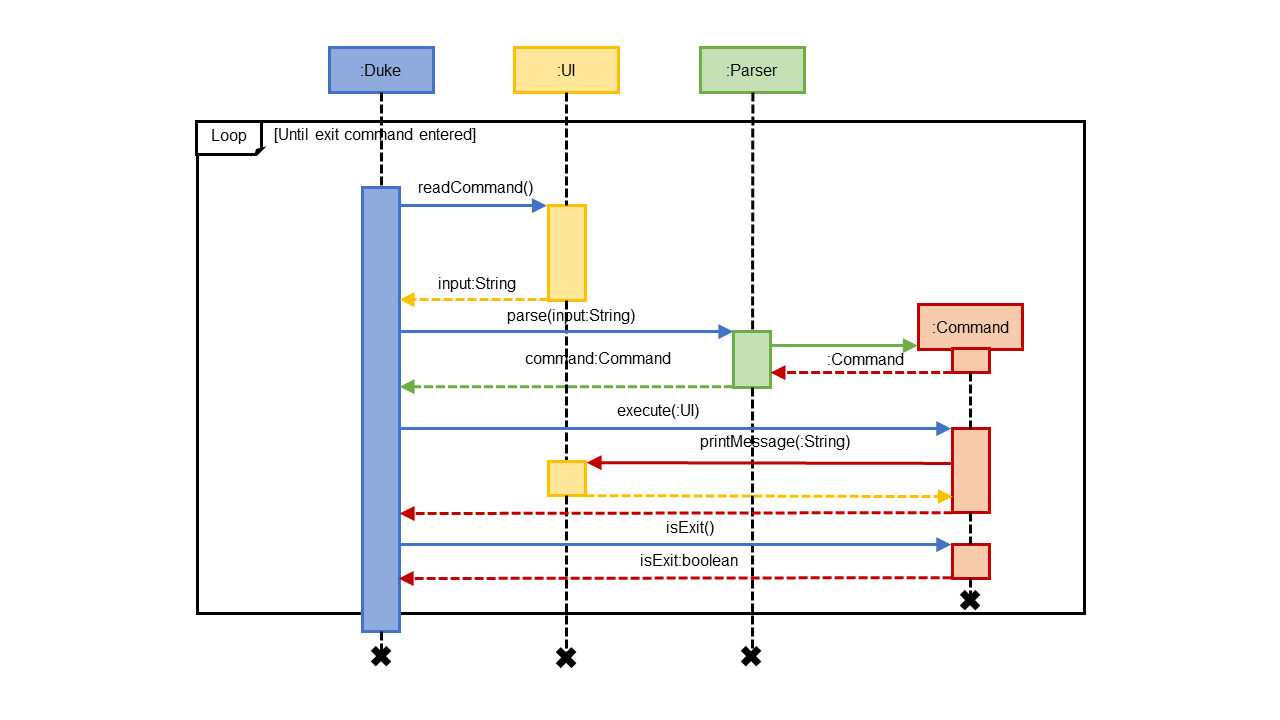
Figure 3 - GULIO Sequence Diagram
Upon starting up GULIO, the Duke (main) class calls run() which enters a while loop and reads in user input. In the loop, the Parser component processes the user input into various commands implemented in GULIO. The loop ends when the user enters exit.
UI Component
API: UI.java
- Facilitates the CLI interface
- Methods to display general messages, prompt messages and error messages
- Reads in user’s input, and used by Command classes to react to user’s inputs
- The
UIobject created as an attribute in Duke is passed into each command to be executed - Instances of
UIare used by tests in general
Parser Component
API: Parser.java
-
Determines the command entered by the user
-
Parses the parameters needed by subclasses of the
Commandobject (for commands which require additional details) -
Checks the validity of parsed parameters, in some instances calling methods from other relevant classes, e.g. calling a method from the
Lessonsclass to verify parsed lesson links. -
May instruct
UIto print warnings and prompts to users, e.g. when users enter invalid parameters. -
Returns a new
Commandobject with all the necessary attributes filled
Command Component
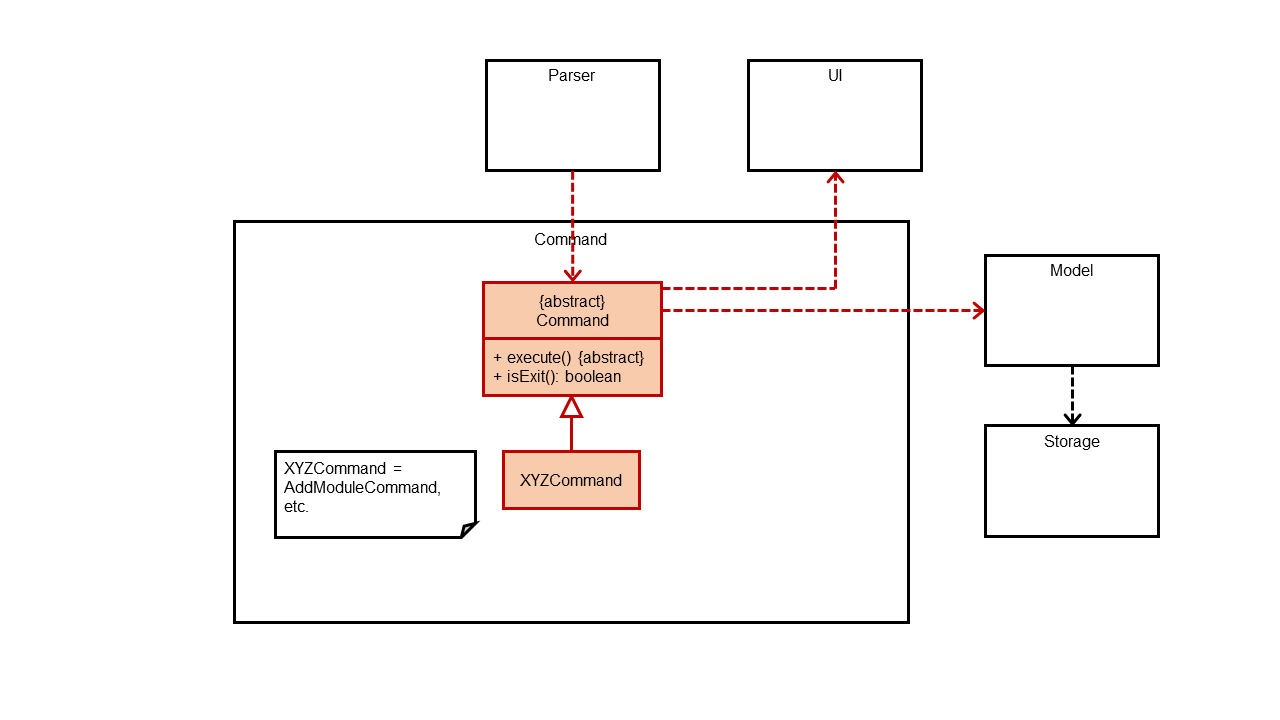
Figure 4 - Visualisation of Dual Layer Command System
API: Command.java
The Command component consist of an abstract Command class, as well as its subclasses. Each subclass handles a specific command in GULIO. The abstract Command class contains methods that these commands inherit from.
Steps for command execution:
- The
Parservalidates user input and returns aCommandobject toDuke Dukecalls the execute method in theCommandobject- Depending on the command, it may make changes to the objects within the Model component
- If there are changes, the Model component then updates application data via the Storage component
- The
UIprints user information related to the command executed
Model Component
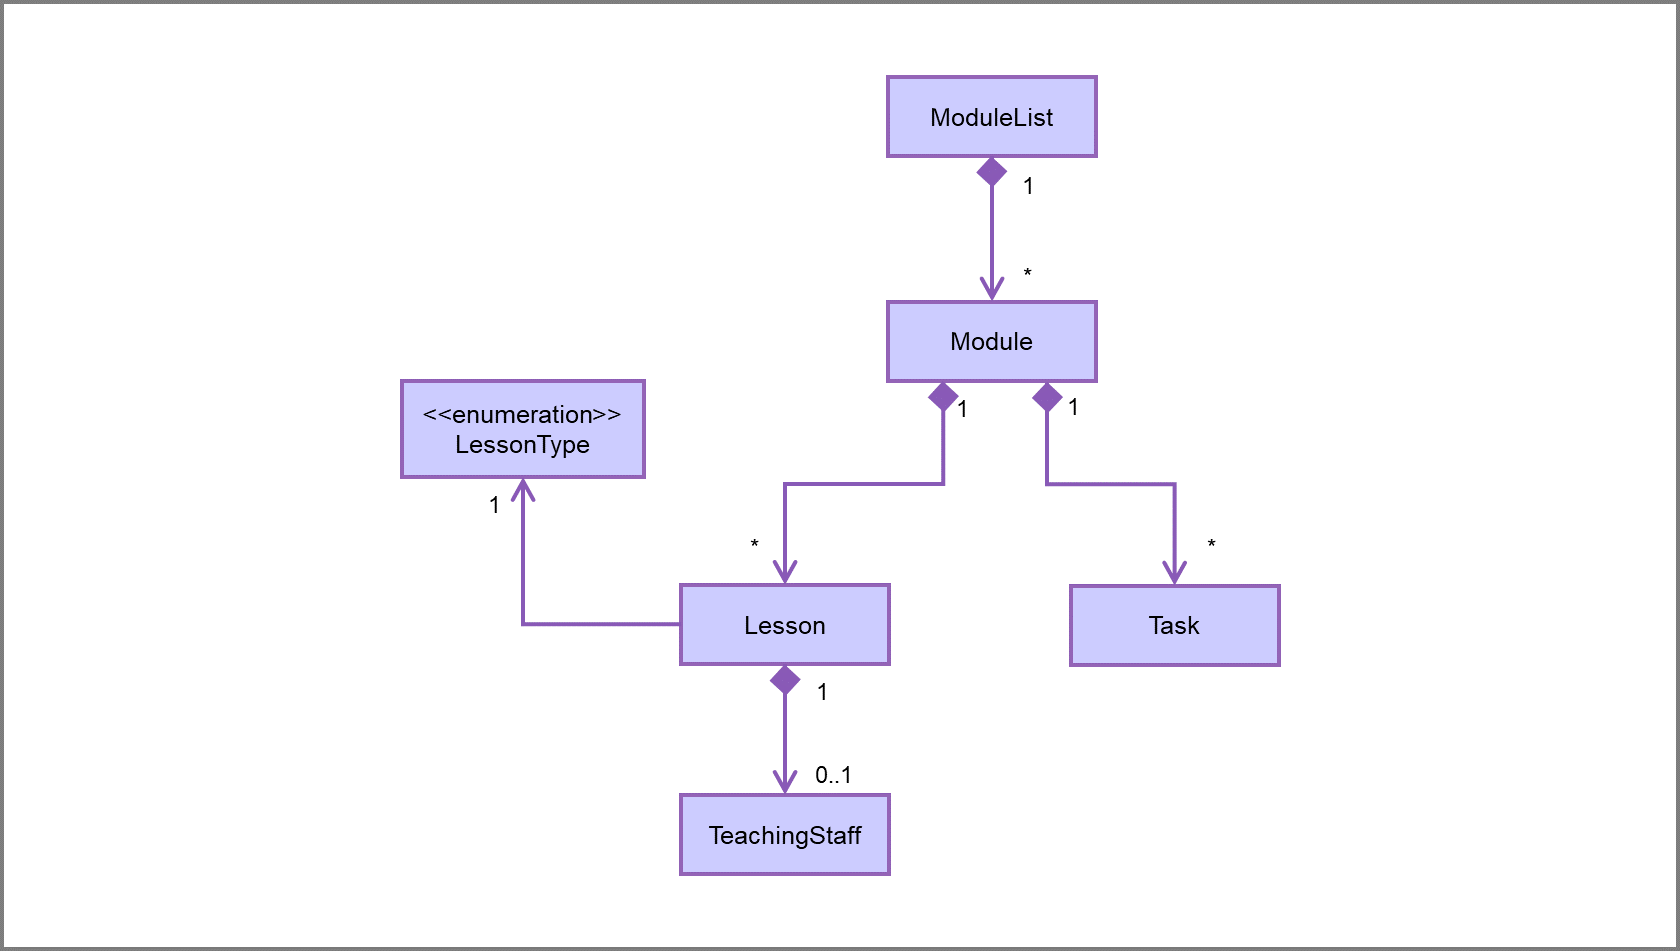
Figure 5 - Class Diagram of Model
The Model component consists of classes that represent real-world objects related to the program. ModuleList represents the various modules that a typical SoC student may be taking within the semester. Each of these modules is encapsulated in the Module class which contains an ArrayList of Lesson and Task objects representing the lessons that would be conducted for the module and tasks that students have to complete for the modules they are taking.
ModuleList:
ModuleList is responsible for managing loaded modules in the program and keeping track if a user is at the dashboard or within a selected module. ModuleList interacts with instances of the Loader and Writer class to load and write data respectively to the storage files. It also contains methods to sort data.
The ModuleList class contains the attributes:
- ArrayList of module code strings
- Class-level member storing
Module
Module:
The Module class contains the attributes:
- Module code string
- ArrayList of
Lesson - ArrayList of
Task
Lesson:
In SoC, lessons are conducted by a combination of lectures, tutorials or labs. To enforce this constraint, the Enum class LessonType contains a set of constants for lecture, tutorial and lab.
The Lesson class contains attributes related to a typical course lesson:
- Lesson Type, e.g. lab, tutorial or lecture
- Time and day of the lesson (stored as a String for flexibility)
- Link for online lessons
- Teaching Staff information encapsulated in
TeachingStaff
Teaching staff:
Being enrolled in several modules, it would be useful for students to store names of the teaching staff the way they prefer to be addressed along with their email addresses in events that require the student to call upon or inquire a teaching staff for a module.
The TeachingStaff class contains the attributes related to the teacher(s) of a particular lesson:
- Name of the teacher
- Email address of the teacher
Task:
The Task class contains attributes related to an assignment, deadline or task in a university setting
- Description of task
- Deadline of task
- Remarks
- Done status
- Graded status
Storage Component
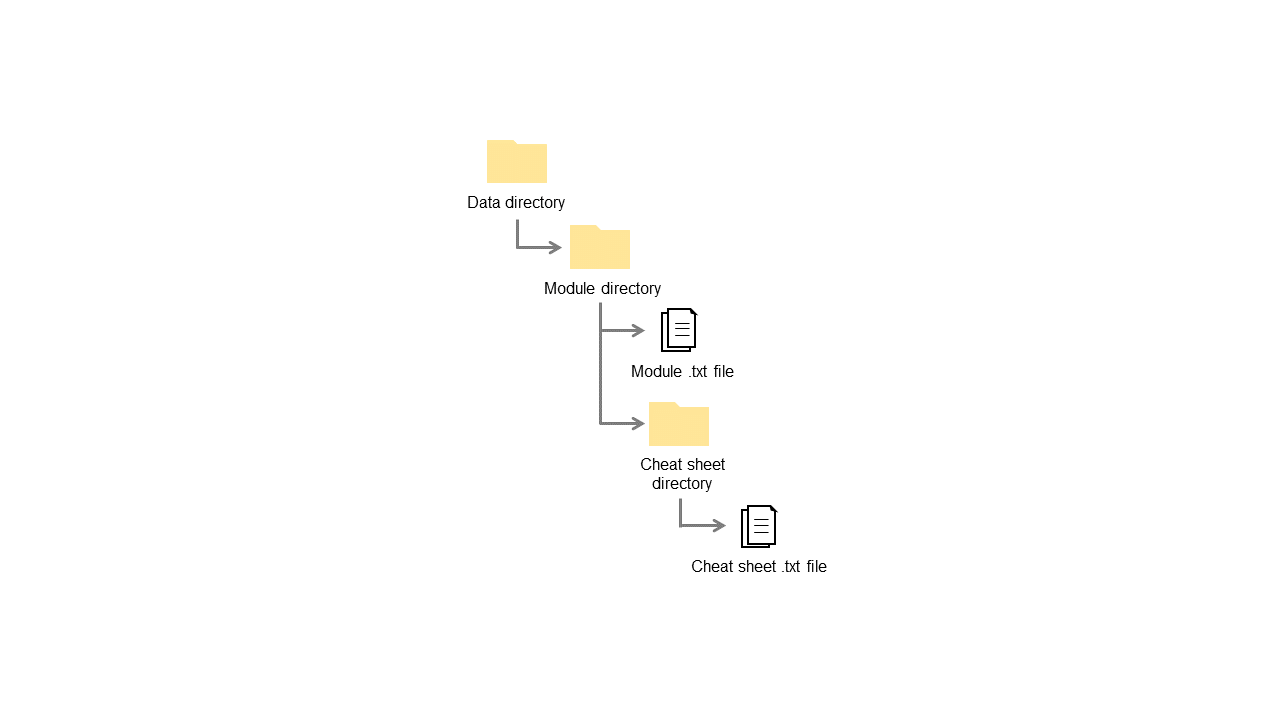
Figure 6 - Illustration of Storage Structure
The Storage component is responsible for creating and loading modules and their respective data, as well as saving the data each time a change is made. It consists of two classes: Loader and Writer. At every moment, Loader only loads up to 1 module at a time and data for each module is stored separately. This is done to ensure fast loading and writing of files.
Loader:
- Loads the list of modules from the “Data” directory
- Loads lesson and task data from the selected module’s “.txt” file
Writer:
- Creates all the directories required
- Deletes files and directories
- Creates the “.txt” file that saves the module’s lessons and tasks
- Writes changes to the “.txt” file that saves the module’s lessons and tasks
Editor Component
API: TextEditor.java
The Editor component is responsible for opening the text editor to add or edit cheat-sheets/notes. It consists of two classes:
Text Editor
- Sets up the text editor
- Loads existing file from Cheatsheet directory within a module for the edit cheat-sheet command
- Flushes out the text from the editor when a different or new file is opened
- Adjusts the font size of the text within the editor
- Detects mouse input to change font style and save the text
- Saves the text from the text editor into a file
ShortcutListener
- Detects keyboard input for shortcuts
Common Classes
Classes that are used by multiple components:
CommonMethods: Stores methods that are used by multiple componentsConstants: Stores constantsMessages: Stores strings that are printed by theUIDashboardCommands: Enum of commands that can be used outside a moduleModuleCommands: Enum of commands that can be used inside a moduleInputValidator: Validates user input such as file name
Implementation
In this section, we highlight a few of the key features whose implementations are reflective of most of the commands available, as well as those that are more unique to GULIO.
Adding of Lesson
The AddLessonCommand class is responsible for the creation and addition of a new Lesson object to the lesson list of a given module. The following sequence diagrams shows how a new Lesson is created and added to the lesson list.
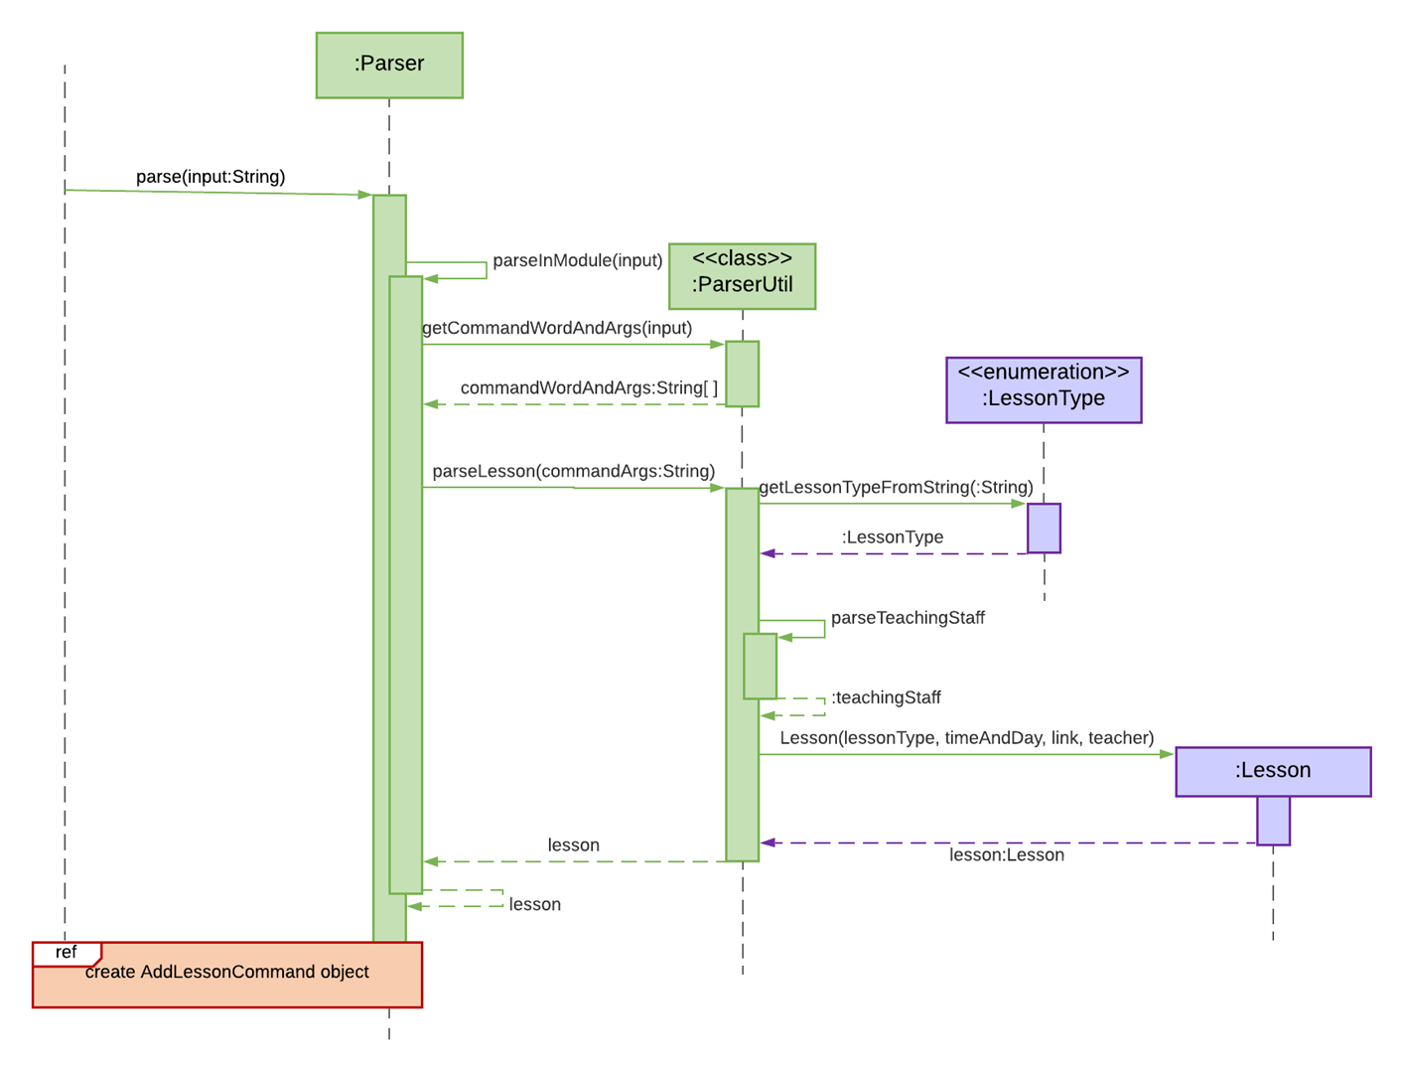
Figure 7 - parse() Sequence Diagram
The creation process is facilitated by the Parser class, which parses the appropriate arguments from the user input and initialises the Lesson object attributes with the parsed values.
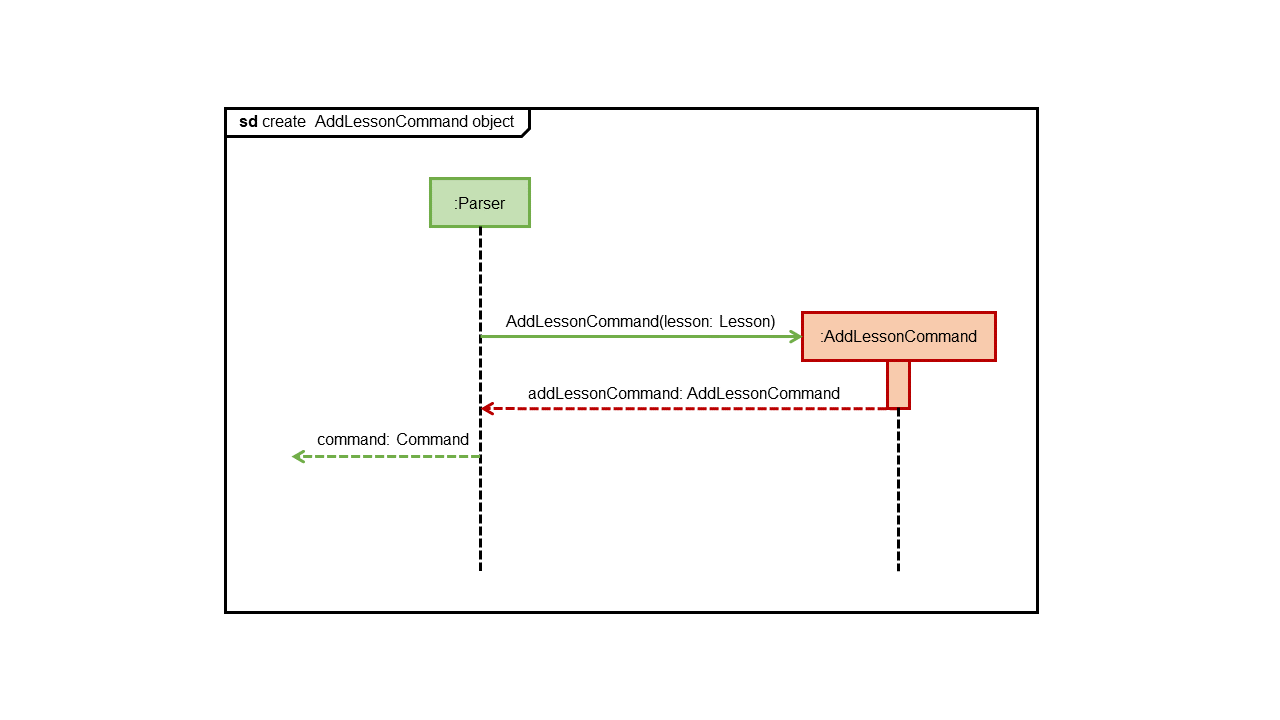
Figure 8 - AddLessonCommand Constructor Sequence Diagram
The newly created Lesson object is then passed to a new AddLessonCommand object as an argument.
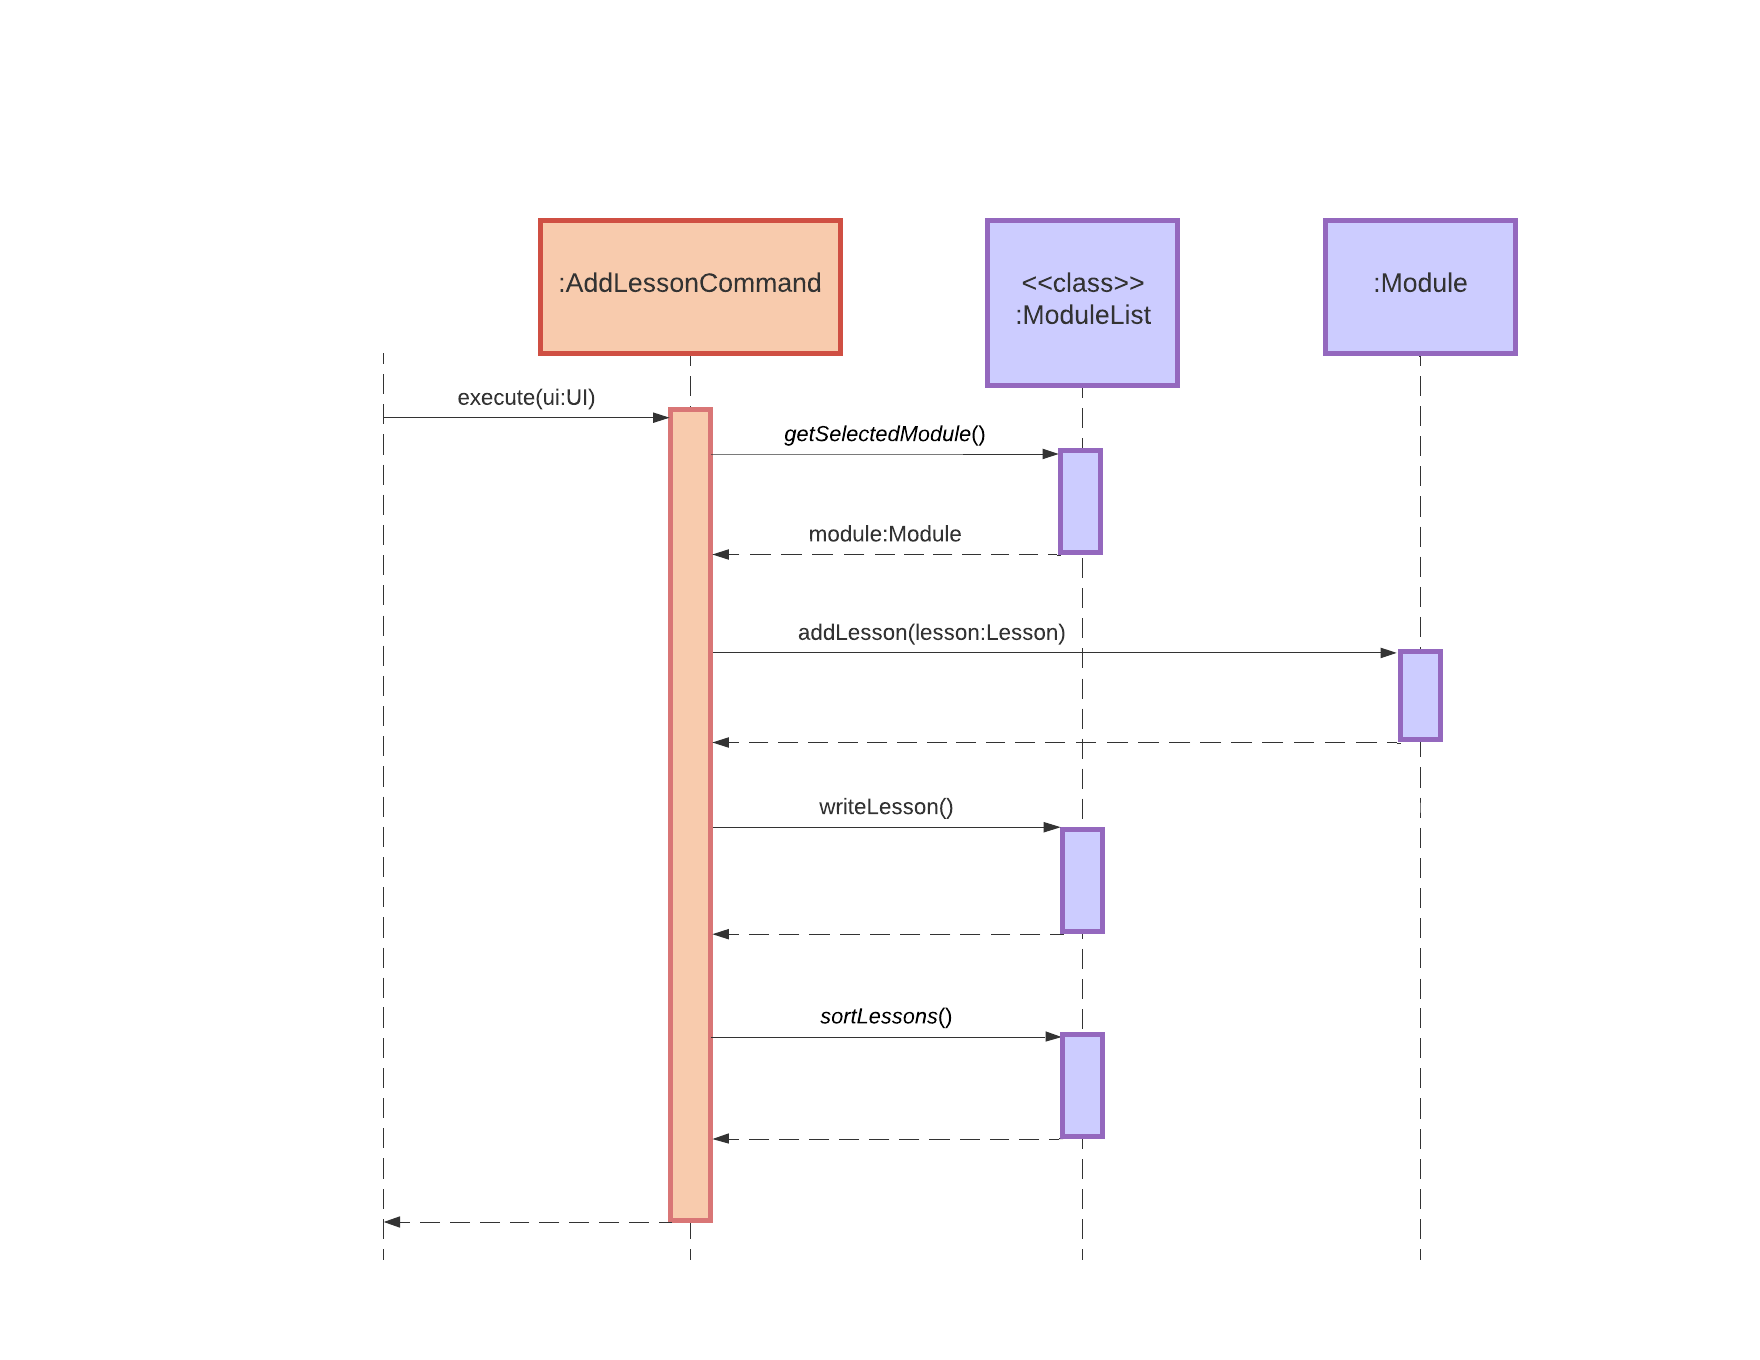
Figure 9 - execute() AddLessonCommand Sequence Diagram
AddLessonCommand then adds the Lesson object to the lesson list of a module. The lessons in the list are sorted by their lesson types each time a new lesson is added. AddLessonCommand also calls the writeLesson() method of ModuleList to update the change locally.
Adding of Cheat-Sheet
The AddCheatSheetCommand class enables the creation, addition and saving of a “.txt” file to the current module’s “Cheatsheet” directory (see Figure 6). Upon creating a new instance of it and calling the execute() method on it, a text editor window will also be automatically opened if there is none opened yet.
An invocation of the add cheat-sheet command involves the following interactions:
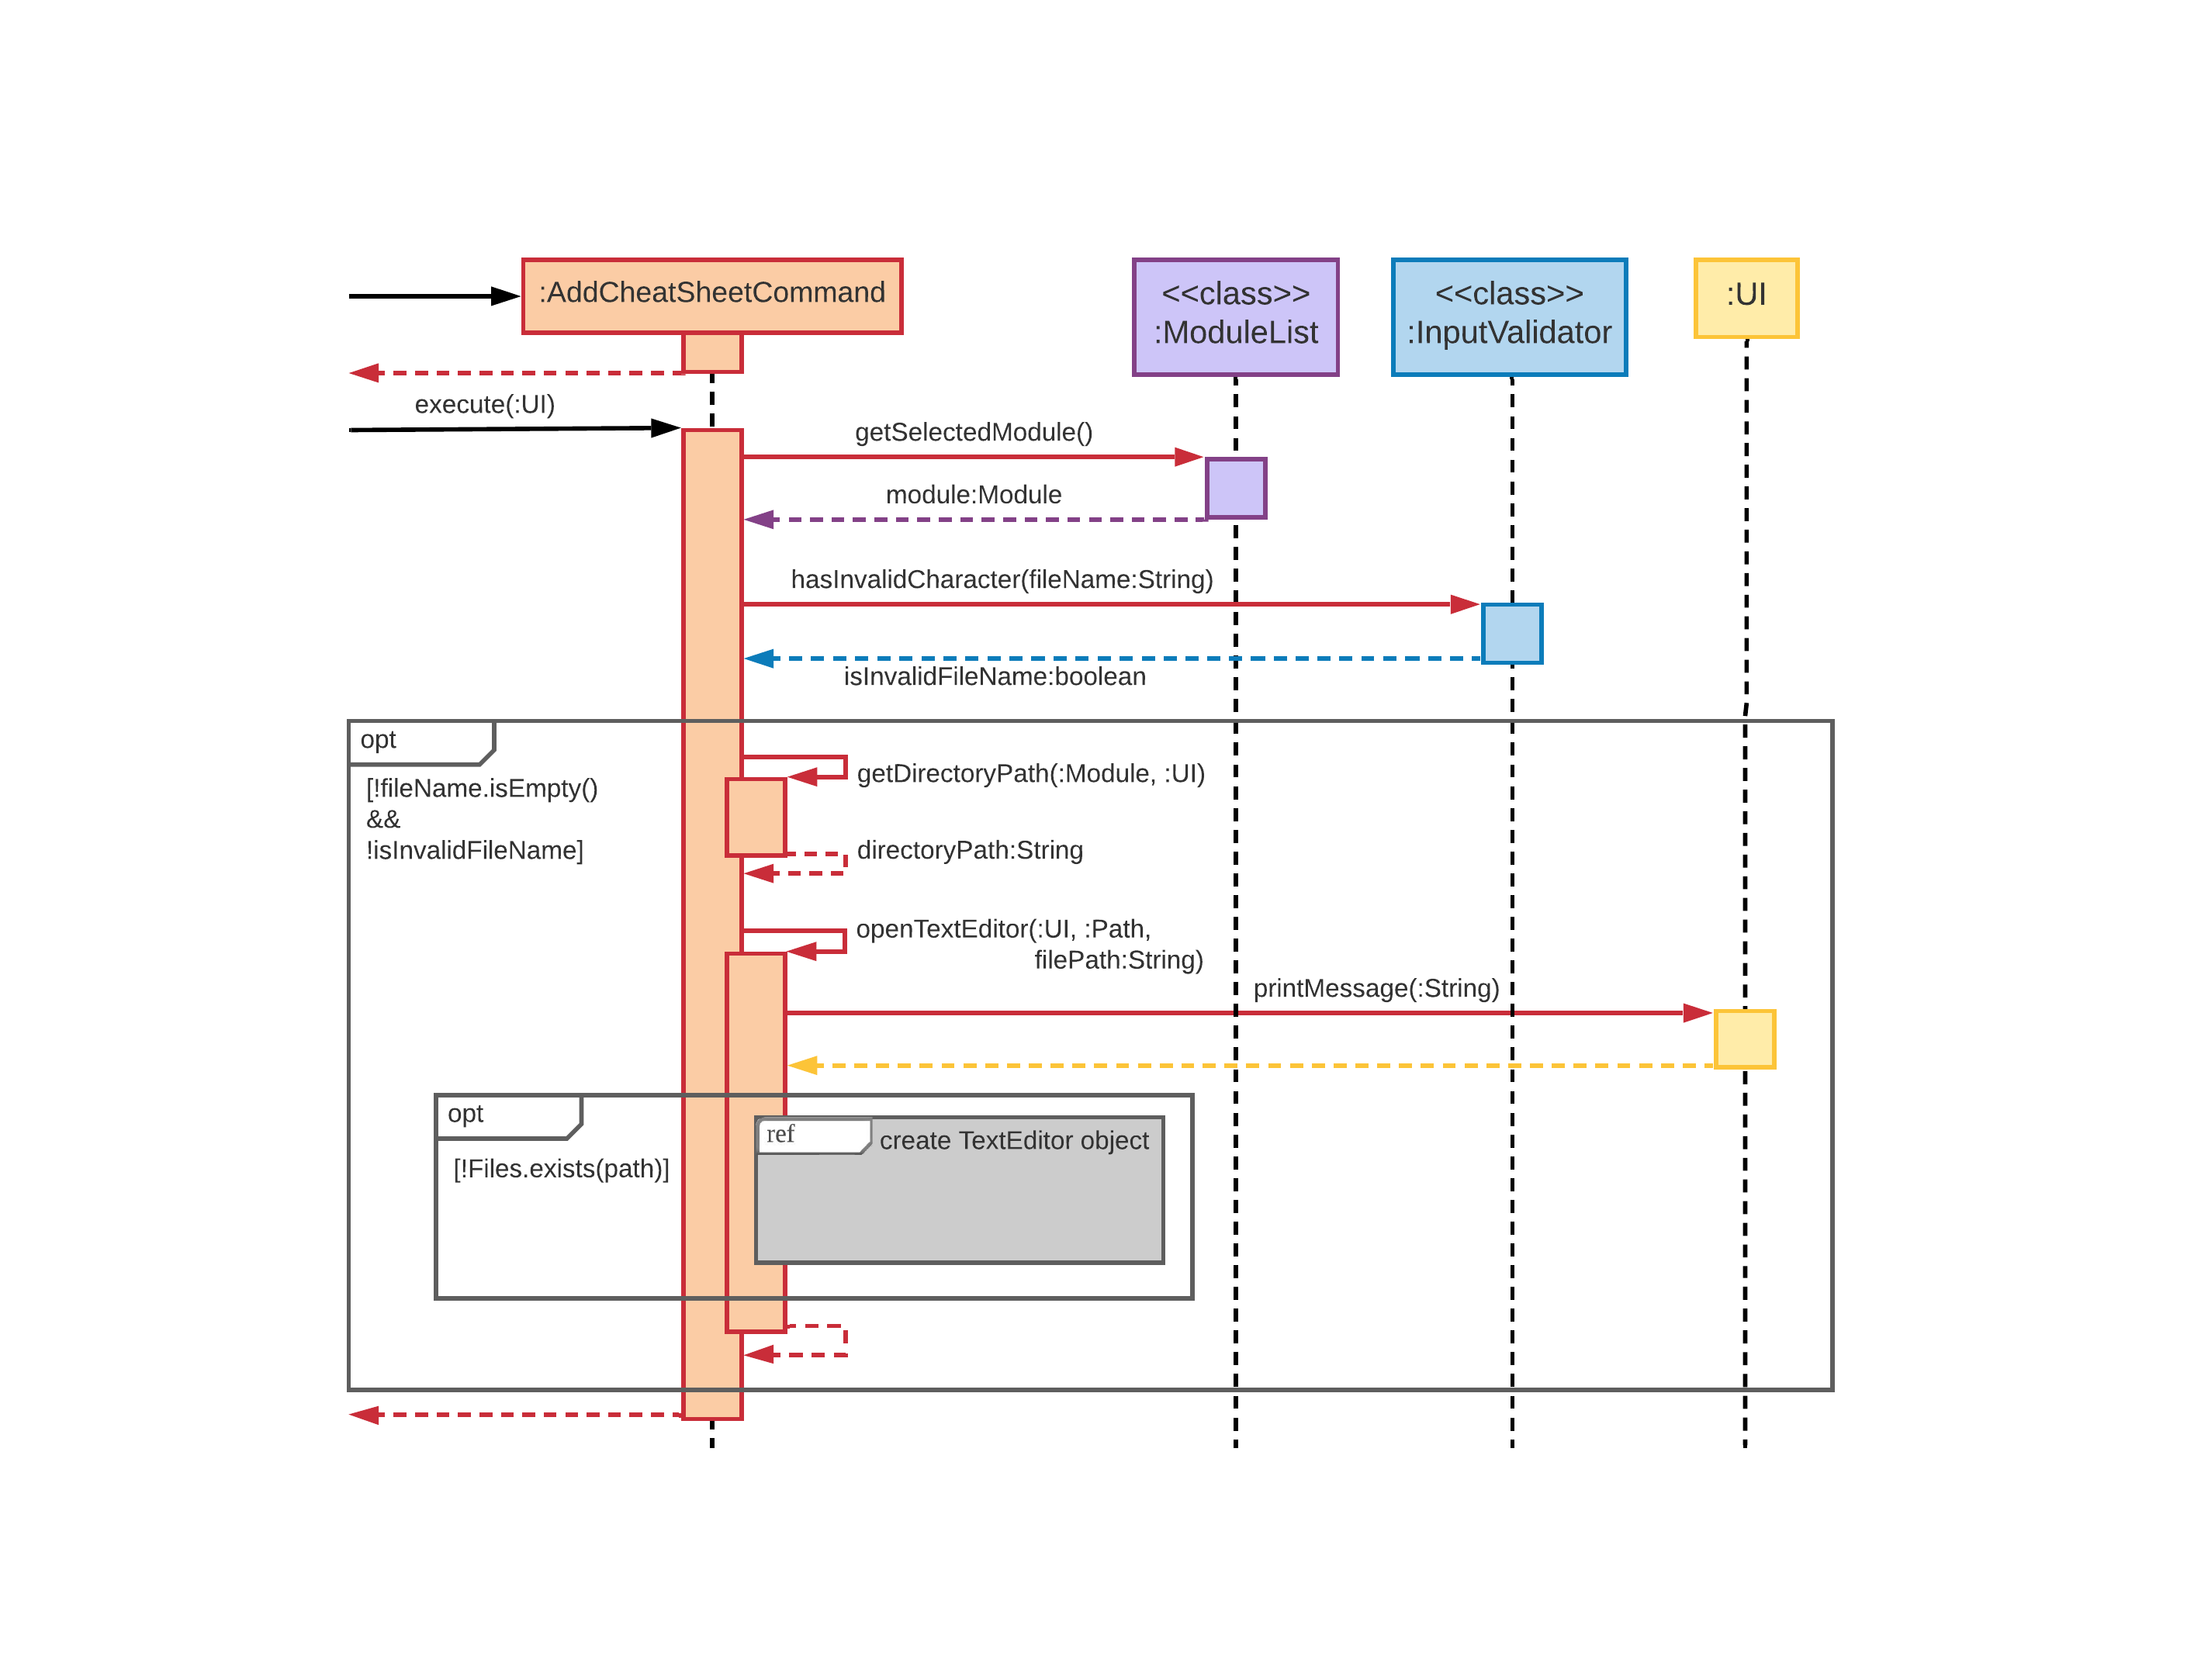
Figure 10a - AddCheatSheetCommand Invocation Sequence Diagram
When AddCheatSheetCommand is executed, it gets the currently selected module by calling the getSelectedModule() method in ModuleList. It then checks if the file name given by the user is invalid. If no, AddCheatSheetCommand proceeds to call the getDirectoryPath() method in itself to obtain the directory where the cheat-sheet would be saved to. It then calls the openTextEditor() method itself, which will interact with the TextEditor class, a Singleton class, in the following way:
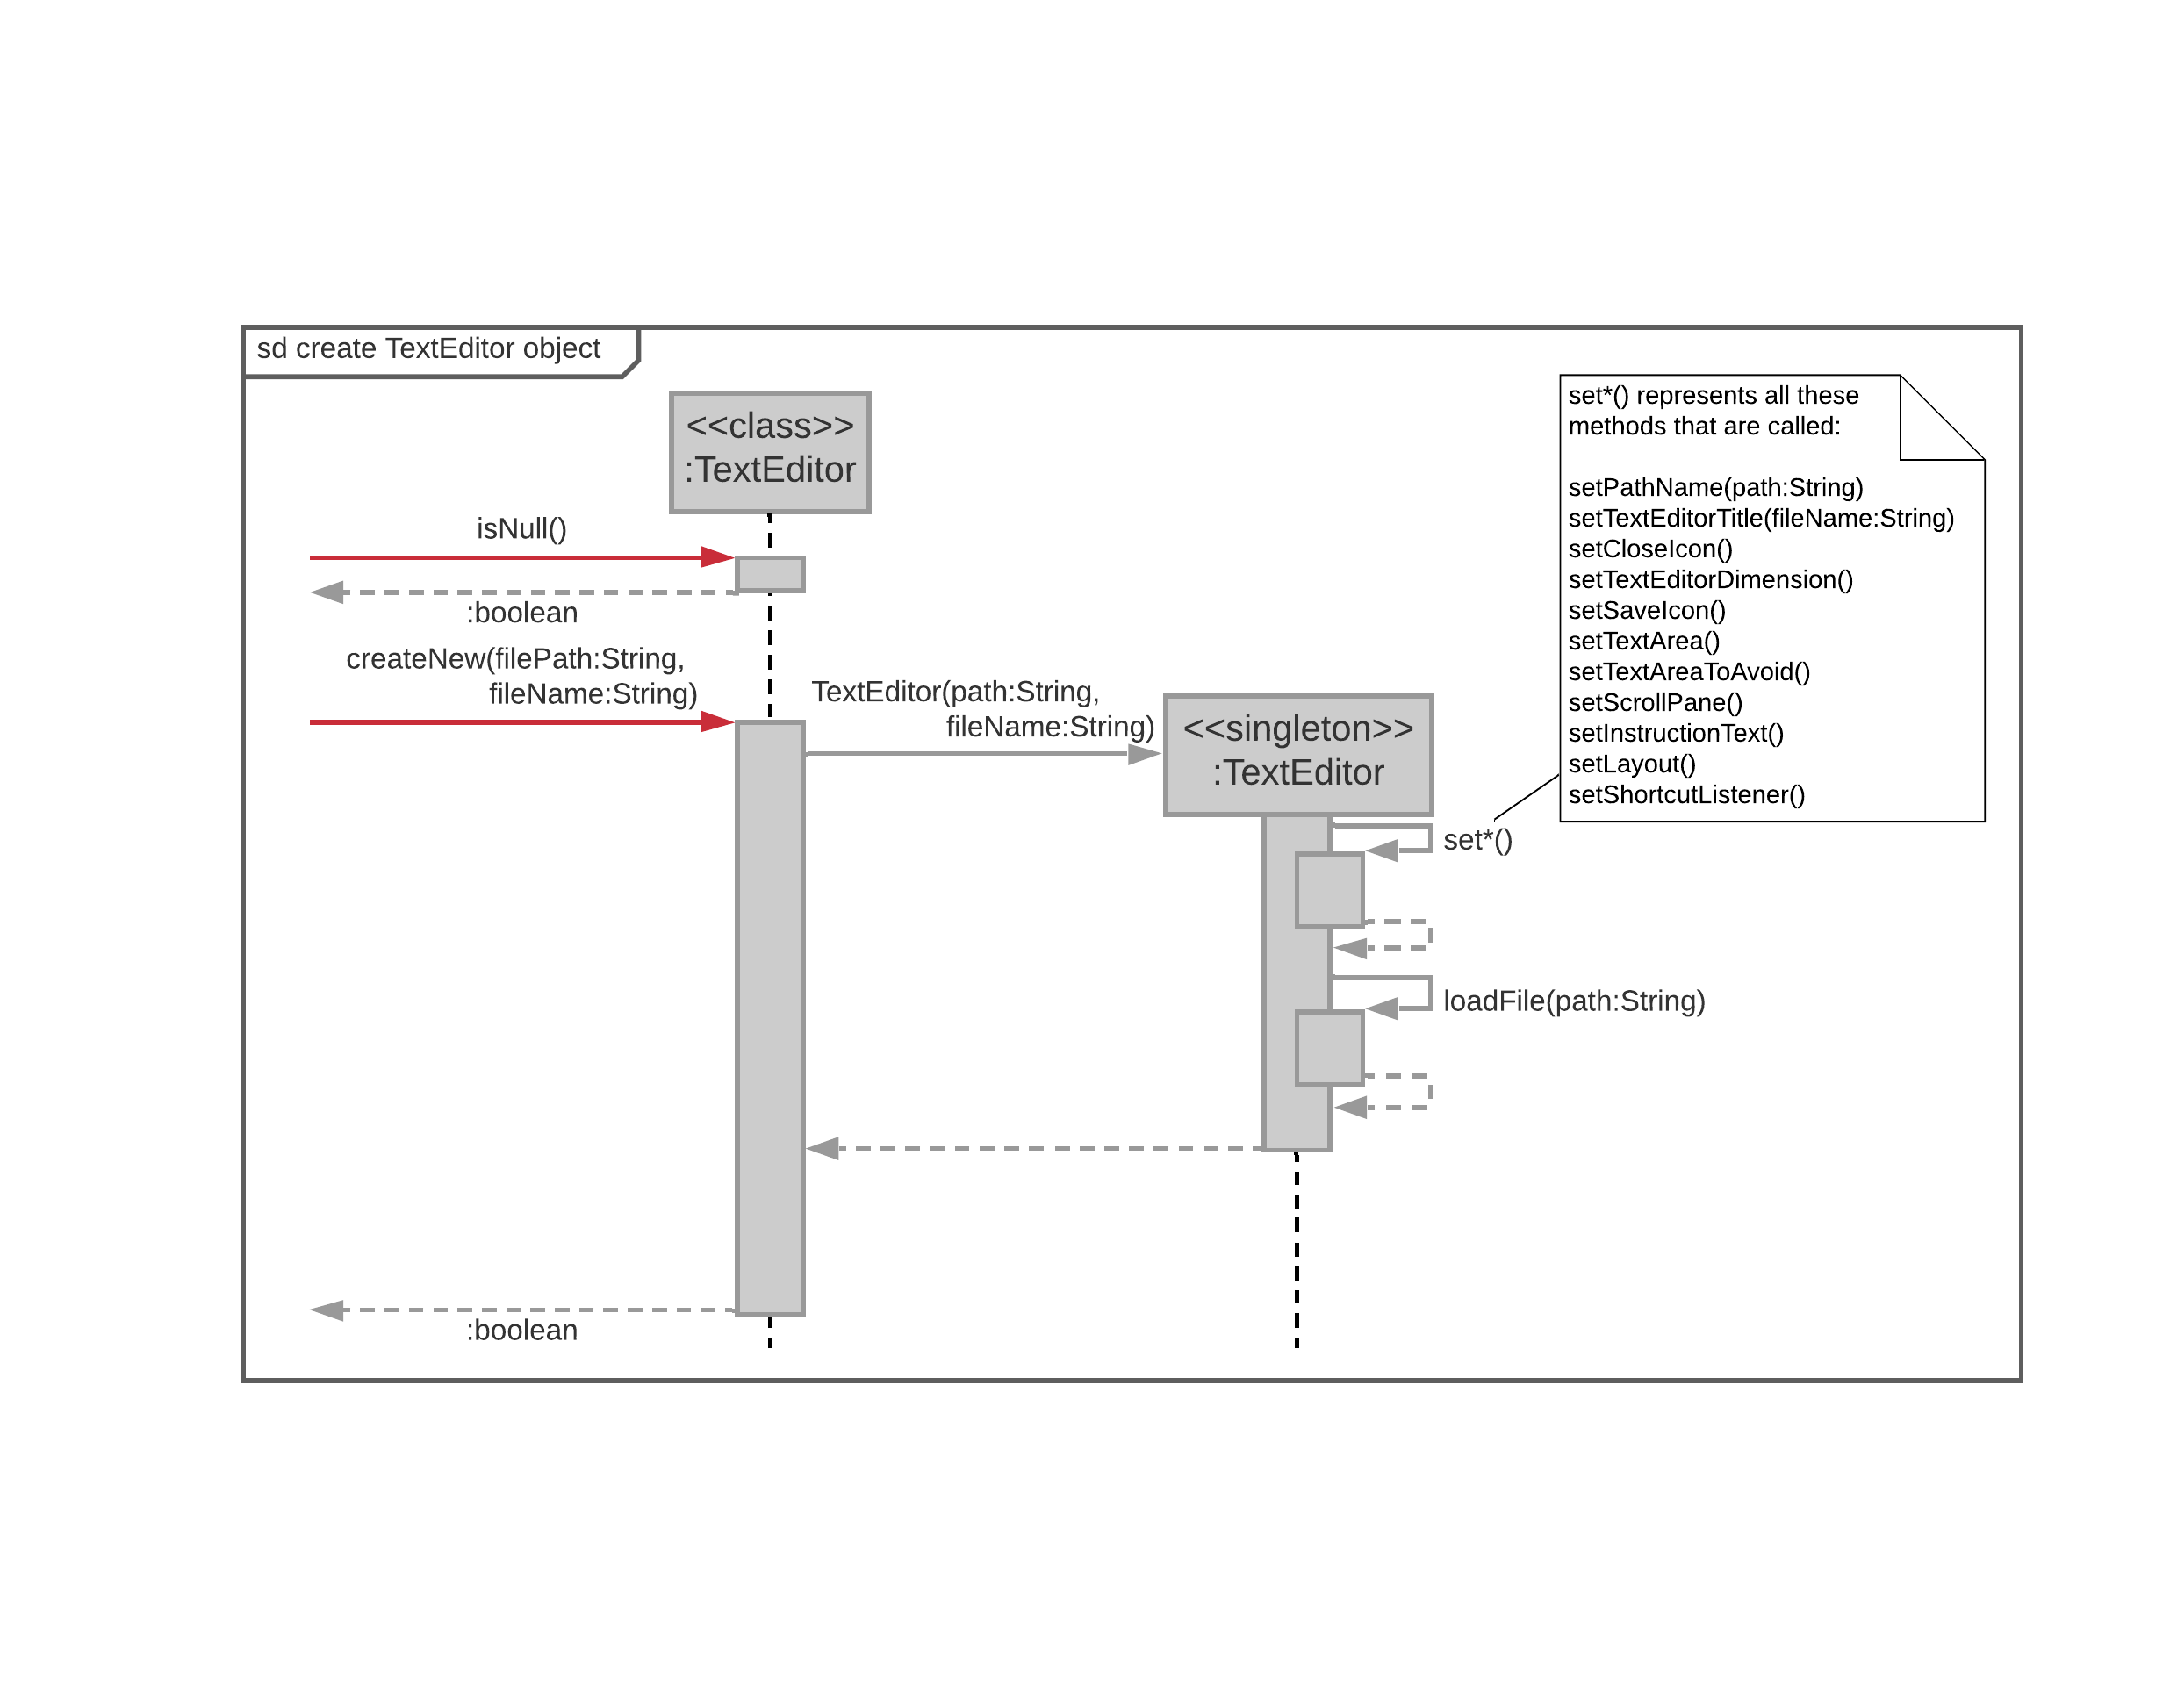
Figure 10b - Opening the Text Editor
The openTextEditor() method will first check if the single instance of TextEditor is null. If it is, then there is no text editor window currently opened and openTextEditor() proceeds to call the createNew() method of TextEditor. This initialises the single instance of TextEditor by calling the class constructor, which sets up, loads from previous data (if any) and opens the text editor for the user. The user can now start typing into the text editor.
Loading & Storing of Data
This section covers how the Storage component works, from the loading of all module codes to the loading of individual module and creation of data files.
Saving of Data
The Writer class is responsible for writing any changes to the module’s data file, as well as creating the file itself. Interaction with the Writer class is done through the ModuleList class, whose methods are called by the other components of the app.
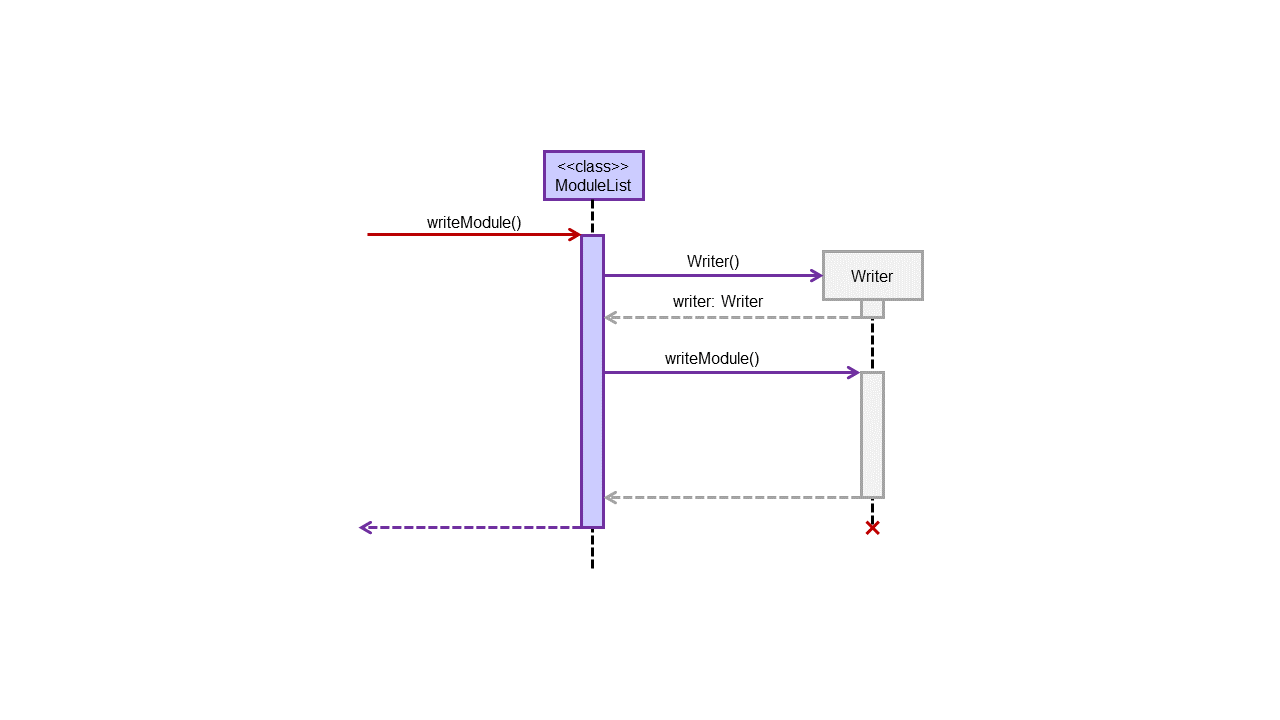
Figure 11 - writeModule() Sequence Diagram
Whenever some data in a module changes, the command that made those changes would call the method writeModule() in ModuleList to update the change in the data file. This method would then call a method of the same name in the Writer class, which overwrites the existing data in the file with the new data.
Due to how much data needs to be written each time, we decided to split the data file by module. That way, we only need to overwrite the module’s data when changes are made.
Loading of Data
The Loader class is responsible for identifying all the modules currently added, as well as loading the data file of the selected class. Methods in the Loader class are accessed by the other components via the ModuleList class.
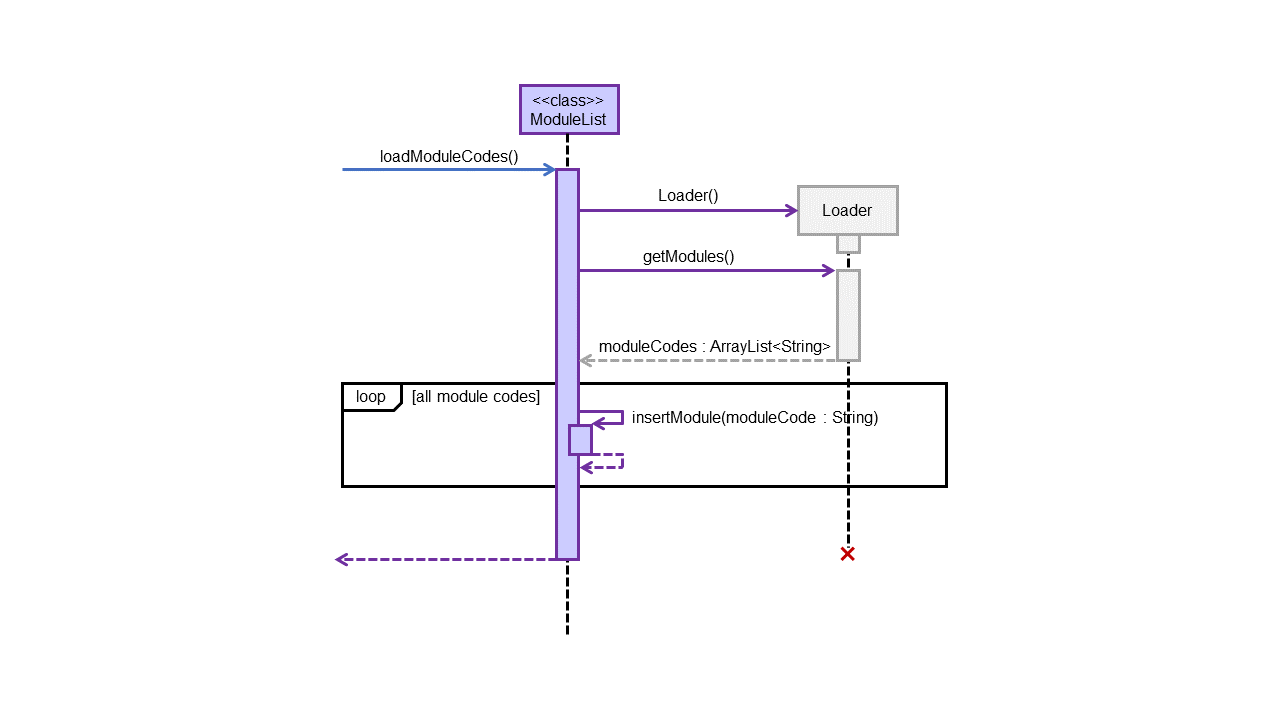
Figure 12 - loadModuleCodes() Sequence Diagram
To identify modules in the “Data” directory, Duke would call loadModuleCodes() method in the ModuleList. This method would then call the getModules() method in Loader, which returns a list of module codes. For each of the identified module code, ModuleList would call its own insertModule() method to add it to the module list.

Figure 13 - setSelectedModule() Sequence Diagram
When a module is selected via the setSelectedModule() method, the specified module code would be searched for in the module list. If it is inside, loadModule() method in the Loader would be called. This method reads the module’s data file for data and adds them into a new instance of Module class. This Module is then returned to ModuleList and set as the selected module.
If the Loader failed to load the file, null would be returned. If null is not returned, ModuleList would sort the data and then use Writer to override the existing file. This is done to remove invalid entries that were initially in the file.
Design Considerations
Implementation of EditLessonCommand and EditTaskCommand
- Initial: used a while loop for fields to be updated that require input validation (email, link for
EditLessonCommandand deadline forEditTaskCommand). It only breaks when the user enters a valid input for the field, otherwise keeps prompting for another input. - Current: notifies the user that the field was unsuccessfully updated, goes on to the next field to be updated (if any).
- Rationale for change: we decided not to use a while loop because we anticipated that if the user changed his/her mind halfway and no longer wanted to edit the lesson or task, they should not be stuck endlessly being prompted for a valid input. In future implementations we could combine both methods to make these commands even more user-friendly e.g. a “cancel” command together with the while loop.
Future Features
- Add weightage for modules.
- Integrate with Github.
- Group project information for each module (e.g. group members’ emails, off-limit days).
- Search via a filter.
Appendix: Requirements
Product Scope
Target user profile:
- Needs a consolidated and personalisable workspace to organize their university modules
- Prefers desktop apps over other types
- Can type fast
- Is comfortable using CLI apps
- Is familiar with command-line shell environment
Value proposition:
Efficiently view and update regularly-needed information on modules and deadlines using a single keyboard.
User Stories
💡 Priority levels:
1: High (Must have)
2: Medium (Good to have)
3: Low (Unlikely to have)
| Priority | As a/an … | I want to … | So that I can … |
|---|---|---|---|
| 1 | new user | see available commands | refer to the help page when I forget how to use the app |
| 1 | NUS student | add a module | store useful information by module that I can easily refer to |
| 1 | NUS student faced with e-learning | add a lesson | consolidate regularly-needed information such as Zoom links by tutorial/lecture, for quick access before the lesson |
| 1 | busy NUS student | add a task | keep track of assignments and deadlines for a module in an organised to-do list |
| 1 | NUS student | get an overview of the module / lesson / task list | filter out specific information with a single command |
| 2 | NUS student | delete a module | store the information only temporarily, e.g. for the semester/term |
| 2 | NUS SoC student | open a module’s cheat sheet(s) | I have a handy list of tools for the module, tests and exams at my disposal |
| 2 | NUS SoC student with many team projects | View a module’s project team information and contact details | keep track of the various teams I am in and communicate more efficiently with my teammates |
| 3 | busy NUS student | sort tasks by graded and done status | know which tasks are of highest priority |
Note: some are features to be implemented in future.
Non-Functional Requirements
- Text editor will only work on OS with GUI support.
- All other features will work on any mainstream OS.
- It should work for students taking up to 10 modules.
- Each module should be able to store 100 tasks without issues.
- Every command should respond within 10s of input on a typical modern computer.
Glossary
- Mainstream OS: Windows, Linux, Unix, OS-X
- CLI: Command-Line Interface
- GUI: Graphical User Interface
- Module: A university module
Appendix: Instruction for Manual Testing
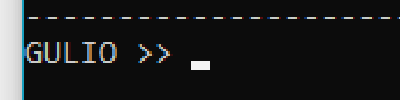
Due to the 2-layer command system, you will need to identify which layer you are on in order to run the tests correctly. To identify which layer you are on, simply check the tag beside your input, known as the input label.
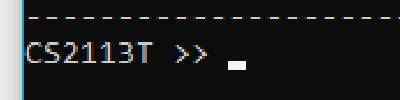
GULIOindicates that you are at the dashboard layer.- A module code (e.g.
CS2113T) indicates that you are within that module.
|
|
|
Launching GULIO
- Shift the file GULIO.jar to your desired directory.
- Open command prompt and navigate to the directory.
- Enter
java -jar GULIO.jarinto the command prompt.
Expected outcome: Prints welcome message.
Exiting GULIO
- Ensure that no module is selected. Input label should show
GULIO. - If you see a module code instead, enter
closeto close the module.
Expected outcome: Input label changes to
GULIO. - Enter
exit.
Expected outcome: Prints exit message and program closes.
Adding a Module
- Ensure that no module is selected. Input label should show
GULIO. - If you see a module code instead, enter
closeto close the module.
Expected outcome: Input label changes to
GULIO. - Enter
mods.
Expected outcome: Lists all existing modules.
- Enter
add <module>where <module> is a module code that is not in the list.
Expected outcome: Prints success message.
- Enter
modsagain to list all existing modules.
Expected outcome: New module is added to list.
Deleting a Module
- Ensure that no module is selected. Input label should show
GULIO. - If you see a module code instead, enter
closeto close the module.
Expected outcome: Input label changes to
GULIO. - Enter
del.
Expected outcome: Lists all existing modules and asks for indices to delete.
- Enter indices of modules to delete, separated by space.
Expected outcome: Prints success message.
- Enter
mods.
Expected outcome: Specified modules deleted.
Opening a Module
- Ensure that no module is selected. Input label should show
GULIO. - If you see a module code instead, enter
closeto close the module.
Expected outcome: Input label changes to
GULIO. - Enter
mods.
Expected outcome: Lists all existing modules.
- Enter
open <module>where <module> is a module code in the list.
Expected outcome: Prints overview of module and input label changes to module code.
Closing a Module
- Check if a module is selected via the input label.
- If the input label shows
GULIO, entermods.
Expected outcome: Lists all existing modules.
- Add a new module if the list is empty. E.g.
add CS2113T - Open one of the modules. E.g.
open CS2113T
Expected outcome: Prints overview of module.
- Enter
close.
Expected outcome: Input label changes back to
GULIO.
Adding a Lesson
- Check if a module is selected via the input label.
- If the input label shows
GULIO, entermods.
Expected outcome: Lists all existing modules.
- Add a new module if the list is empty. E.g.
add CS2113T - Open one of the modules. E.g.
open CS2113T
Expected outcome: Prints overview of module.
- Enter
lsn.
Expected outcome: Lists all lessons for that module.
- Add a new lesson. E.g.
add lsn lecture ;; Friday 6pm.
Expected outcome: Prints success message.
- Enter
lsn.
Expected outcome: New lesson added to list.
Deleting a Lesson
- Check if a module is selected via the input label.
- If the input label shows
GULIO, entermods.
Expected outcome: Lists all existing modules.
- Add a new module if the list is empty. E.g.
add CS2113T - Open one of the modules. E.g.
open CS2113T
Expected outcome: Prints overview of module.
- Enter
del lsn.
Expected outcome: Lists all existing lessons and asks for indices to delete.
- Enter indices of lessons to delete, separated by space.
Expected outcome: Prints success message.
- Enter
lsn.
Expected outcome: Specified lessons removed from list.
Opening a Link
- Check if a module is selected via the input label.
- If the input label shows
GULIO, entermodules.
Expected outcome: Lists all existing modules.
- Add a new module if the list is empty. E.g.
add CS2113T - Open one of the modules. E.g.
open CS2113T
Expected outcome: Prints overview of module.
- Add a new lesson with a link. E.g.
add lsn lecture ;; Friday 4pm ;; https://nus-sg.zoom.us/.
Expected outcome: Prints success message.
- Enter
link.
Expected outcome: Lists all existing lessons.
- Enter indices of lessons with links to open.
Expected outcome: Opens link for lessons selected.
Command Summary
Dashboard Commands Summary
| Keyword | Format |
|---|---|
| help | help |
| exit | exit |
| open | open <module code> |
| add | add <module code> |
| delete | del |
| modules | mods |
Module Commands Summary
| Keyword | Format |
|---|---|
| help | help |
| close | close |
| info | info |
| add lesson | add lsn <lesson type> ;; <day & time> ;; <link> ;; <teaching staff name> ;; <email> |
| delete lesson | del lsn |
| edit lesson | edit lsn |
| link | link |
| teacher | tch |
| lessons | lsn |
| add task | add task <task name> ;; <deadline> ;; <remarks> |
| delete task | del task |
| edit task | edit task |
| mark | mark |
| unmark | unmark |
| tasks | task |
| add cheat-sheet | add cs <cheat-sheet name> |
| delete cheat-sheet | del cs <cheat-sheet name> |
| edit cheat-sheet | edit cs <cheat-sheet name> |
| cheat-sheets | cs |